For many of us, there is nothing better than spending a winter's day in the mountains with family or friends. It's often tempting to leave the groomed slopes - whether it's because of the untracked powder or because you want to escape the crowds. But once you head out into the open, safety and the right equipment become top priorities. First and foremost is the avalanche transceiver.
Whether you're freeriding in powder or on a ski tour, avalanches are a real danger for anyone who loves to go off-piste. That's why you need high-quality safety equipment. In addition to the probe and shovel, the right equipment also includes the centrepiece: the avalanche transceiver or avalanche beacon.
In our article, we tell you more about these useful gadgets that can quickly become lifesavers. Together with the mountain experts from Mammut, we have answered the most important questions about avalanche transceivers for you.
What is an avalanche transceiver?
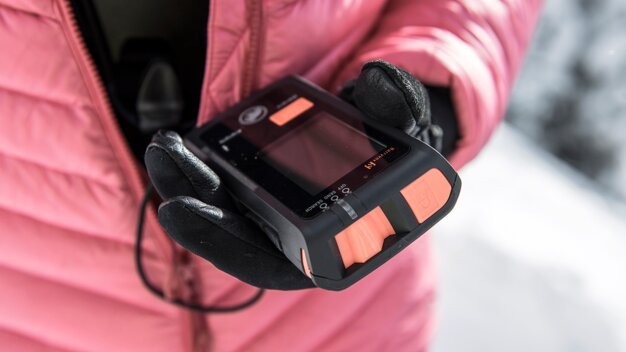
An avalanche transceiver or also called avalanche beacon is like the high-tech equivalent of an avalanche dog. In short, it helps you to find buried people in the event of an avalanche and to be located yourself in case you got cought. This requires that the receiver and transmitter be worn close to your body.
An avalanche transceiver is a tool that emits electromagnetic pulses at a fixed frequency of 457 kHz in short periods of time (approximately once per second). Transmission and reception take place via antennas, whereby modern devices usually have three of them in order to determine the direction as accurately as possible.
Note: The signals of the avalanche transceivers are compatible with each other. This means you don't have to worry that you won't be able to find a buried person in an emergency just because they are using a different brand.
How to wear your avalanche transceiver correctly
Simply owning an avalanche transceiver is not enough. Using it correctly is crucial and must be practised - so you learn the necessary moves to be able to rescue a person yourself.
Before the experts take a look at how to use it properly, let's take a step back. The avalanche transceiver is worn close to the body - usually with the help of a sling. There are now also ski jackets that have a compartment on the inside to stow it away. Important note: If you are on a ski tour and store your jacket somewhere else, you must again ensure that the avalanche transceiver is close to your chest. If you have it in your rucksack, it may come loose. As a result, the backpack and not the person will be found during a search.
Tip: Do not place other electronic devices such as mobile phones near the avalanche transceiver, as these can interfere with the signal quality.
Avalanche transceiver or PLB - what's the difference?
PLBs (personal locator beacons) are less known than avalanche transceivers. These are emergency call transmitters that send out a signal in the event of great danger. However, unlike avalanche transceivers, PLBs do not help you to find buried victims. The reason for this is the different transmission frequencies: PLBs use a frequency of 406 MHz for the emergency signal and a frequency of 121.5 MHz for the local search. Localisation between the avalanche transceiver and PLB device is therefore not possible.
What makes a good avalanche transceiver?
When choosing an avalanche transceiver, the most important factors are accuracy, speed and ease of use. Depending on the manufacturer and model, the search can be visual, audiovisual or auditory. Modern devices have an integrated display, show directions and distances, indicate multiple burials and support you with audio signals.
Avalanche search devices often differ in the following product features:
- Number of antennas: An avalanche transceiver with three antennas provides the most precise localisation according to the current state of the art.
- Display: An easy to use, clear screen makes it easier to find a buried victim in an emergency.
- Range: The larger the radius of your signal, the sooner you will receive information about a buried person.
- Multiple victim search: This option allows you to locate multiple buried victims at once. Depending on the model, the buried person can also be marked on your own device.
- Audio signal: Beeps indicate when you are approaching the person you are looking for. The sound changes depending on the distance.
- Voice recognition: Some manufacturers' devices can now also be operated using your own voice.
- Auto revert to send: With this additional function, the avalanche transceiver automatically switches to send mode. This action is time- or motion-controlled and is intended to prevent rescuers from not being found in the event of a secondary avalanche.
Our product tip: the Mammut Barryvox®. It offers fast and precise localisation with simple operation - a real lifesaver!
How is an avalanche transceiver used correctly?
Every device works differently - that's why you should read the operating instructions for your device carefully, take part in an avalanche course and practise using it regularly with friends. The best thing to do is simply bury a rucksack with an avalanche transceiver in the snow and off you go!
Note: While the chance of being rescued alive from an avalanche within 10 minutes is still relatively high, this curve drops drastically after that. Every second counts.
The avalanche search at a glance
If a person has been caught in an avalanche, the following steps should be taken:
- In the beginning, it is important to guarantee your own safety and to rule out possible secondary avalanches.
- First observe the area of the avalanche. It is possible that the person was lucky and was not fully buried. You can then compare your visual impression with the avalanche transceiver. Bear in mind that skis or poles may be in a different position to the person themselves.
- The search:
- Signal search: Switch your avalanche transceiver to "Search". Depending on whether you are travelling alone or in a team, there are different movement patterns for checking out an area for a signal.
- Rough search: As soon as you pick up a signal, you start to search up to a distance of 5 metres. Use the visual cues (distance and direction) and the beeps.
- Fine search: From a distance of 5 metres, change your working method again. To do this, get low to the snow surface. As soon as you have reached the point with the shortest distance, mark the point.
- Point search: Now use the probe from your equipment. Score the snow surface in a spiral pattern until you land a hit. From this point, you will need an avalanche shovel to dig out the person.
The avalanche gear set: avalanche transceiver, probe, shovel and co
When you leave the secured ski area, you will inevitably need the right equipment:
If you want to go off-piste, you should not forget the following items:
- Bivouac sack
- Spare pair of goggles
- Additional layers of clothing
- Drinks and snacks
- Sunscreen
- Sunglasses
- First aid kit
Whilst the avalanche transceiver is worn close to the body, all other items must also have somewhere to go. There are special rucksacks in different sizes for ski tours. They are characterised by compartments for the shovel as well as straps on the outside where additional equipment such as ice axes and the like can be attached.
Our tip: An avalanche backpack increases your chances of not being completely buried by an avalanche. Increasing your volume can lead to "floating" on the avalanche. However, it does not replace an avalanche transceiver, probe, shovel and the associated handling.
The avalanche beacon is an important part of your safety equipment if you plan to leave the slopes. However, carrying an avalanche transceiver, shovel, probe and avalanche backpack is not enough to make you aware of alpine dangers. Only those who practise constantly and plan their tours carefully will be able to keep calm and act prudently in the event of an avalanche. Find out where avalanche courses are offered in your area.
Frequently asked questions about avalanche transceivers
When should I change the battery of my avalanche transceiver?
Sooner rather than later. As soon as the remaining battery life falls below 50 % or the device has been running on the same batteries for more than 5 years, you should replace them. It is also always advisable to have spare batteries with you.
What is an avalanche transceiver check?
An avalanche transceiver check is a function test of the device. The aim is to ensure that the tool is sending and receiving signals correctly. There are so-called avalanche safety check points in ski resorts for this purpose. Depending on the brand and model, it is also possible to run through a pre-programmed group check. But even without an avalanche safety check programme, a manual check is possible.
How old can an avalanche transceiver be?
The more modern the avalanche transceiver, the better. Technical innovations are constantly increasing the range of the signal and making localisation more precise. However, the age has no influence on the compatibility of the devices with each other, as the transmitted frequency (457 kHz) is identical for all devices.
INTERSPORT Rent tip
The RENTertainer recommends
Are you ready for your next backcountry adventure and do you have the necessary avalanche equipment? Great! Then how about trying out the latest snowboard or skis from your favourite brand?
At INTERSPORT Rent you have a large selection of the latest snowboards and skis for rent. Our RENTertainers on site will be happy to show you the top products of the season and help you find the right equipment for you.
Related articles
You may also be interested in:
